|
July 27, 2016
How to: Change your Xyron Create a Sticker maker TapeIf you need some help in changing your sticker maker tape or forgot how, watch this short video and I will show you everything that you need to know.
July 20, 2016 Buck or Two haulHello Everyone,
I went and did some shopping at Buck or Two and bought some craft supplies. If you would like to see what I have purchased watch the video below/ July 13, 2016 80th Birthday card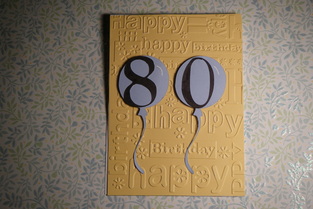
Hello Everyone,
Today I will be showing you how to make a really easy birthday card that took no time at all. My grandpa was turning 80 this year so I thought I would make a card with the age on the font. For the card base I took some white cardstock and folded it in half and cut it down to the size I wanted it with my fiskars paper trimmer. Once the card base was complete I decided to use one of my birthday embossing folders for the background on the front of the card. I took some yellow cardstock and cut it down to the size of the card and then ran it through my big shot machine. After the background was ready I attached it to the card base using my ATG Tape runner. Following the background being adhered to the card I used my cricut machine and the create a critter cartridge and cut out two balloons onto some blue cardstock. Once the balloons where cut out I then switched cartridges to the plantin schoolbook to cut out the numbers 8 and 0 onto some light green cardstock. Following everything being cut out I grabbed some srap cardstock to cover my area where I would be doing some colouring. I decided since I didn’t like the colour of the green cardstock anymore to take my EK success marker in the colour black and just colour over the numbers. Once the numbers were coloured in I attached them to the balloon with my zig two way glue pen and then flipped the balloons over to add some foam tape to make them popped up on the card. For the inside of the card I wanted to add something to the bottom right corner so I grabbed one of my birthday stamp sets and thought I would use the party hats in the set. I inked the hats up with some versafine onyx black in and then stamped them on the card. Next I wanted to stamp the balloon that is also included in the same set. The balloon has a tail to it and I didn’t want it to cover the hats so I took a scrap piece of cardstock and stamped the hats to create a mask. I cut the hats out using my EK success scissors. Once the hats were cut out I placed the mask over the ones I stamped on the card. after everything was cut out and ready I inked up the balloon and stamped it in the card. The last thing I did to the card was add a sentiment to the top and then I thought it looked complete. Supplies
July 6, 2016 Two Easy Bridal Shower Cards
Hello Everyone,
Today I will be showing you how to make two cute bridal shower cards. I had a cousin and a friend getting married this year and was invited to their shower. I made both cards similar but also a little different to fit with the couple. For the front of both cards I decided to use some white cardstock with my heart embossing folder and ran it through my big shot machine. After both pieces of cardstock were embossed I took one of them and flipped it over and marked with a pencil where it would need to be cut. I then cut it using my fiskars paper trimmer. Once everything was cut I decided to adhere one of them onto a piece of dark blue cardstock. For the first card I decide to use some Tim Holtz distress ink in the colour seedless preserves. Following adding the Tim Holtz distress ink I still thought the card could use something at the bottom. So I took some pink bakers twine and loped it around twice and attached it with some tape. I then tied a bow on the front. The last thing I added to this card was heart I cut out using the spellbinders heart die and my big shot machine and attached it to the card with some 3-D pop dots. For the second card I used the same heart background and inked it using some Tim Holtz distress ink in the colour squeezed lemonade. Once the background was inked I attached it to the front of the card using my ATG Tape runner. I thought the card could use something simple on the front but I wanted it to be a little different from the first one. I took one of my penny black stamp and used some versafine onyx balck ink and stamped it on some light purple cardstock. I coloured it in using my EK Success markers. After the image was coloured in I cut it out using my spellbinder heart die and attached it to the card with some foam tape. I decided after that the card could still use a little something so I added some glitter around the hart and a heart piece of ribbon at the bottom. June 29, 2016 Supplies
Hello Everyone,
I will be showing you how to make a cute cupcake themed gift tag. I had a cousin and a friend getting married this year and was invited to their shower. For the gift I decide to make them both the same since they were cute and would be simple to put together. 
I thought the gift tag just tied the whole gift together and went with the cupcake them. Here is how I made the tag.
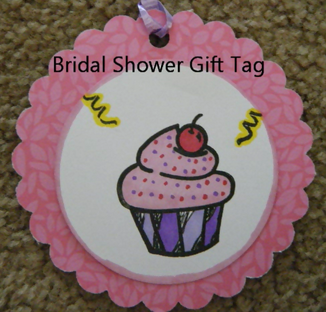
For the tag I took a piece of light blue cardstock and stamped a cupcake with some swirls on either side using some versafine onyx black ink. Once everything was stamped I used my big shot machine and the spellbinders circle dies to cut the cupcake out. I also took a piece of small polka – dotted patterned paper and punched out a scallop with one of my punches. For the cupcake I decided to colour it in using my EK Success markers and attached it with my ATG Tape runner to the scallop. Once the cupcake image was attached to the scallop I flipped it over and stamped to and from using my wooden stamp. As you can see here when I flipped the scallop over I realized that I had stamped it upside down by mistake. I decided to take off the cupcake image and stick it onto another scallop. But thinking about it now I guess I could have just flipped the image around and made it sit right . The last thing I did was take my hole punch and punched a hole at the top for the ribbon to go when tying it to the gift. Supplies
June 22, 2016 How To: Change your Cricut machine bladeHello Everyone, Today I will be showing you how to change your cricut machine blade. Maybe this is your fist time ever changing it or you need a little refresher this easy tutorial will show you everything you need to know.
Supplies June 15,2016 60th Anniversary Card
Hello Everyone,
For this anniversary card I decided to use my big shot machine and the spellbinders hearts dies to cut out two hearts on some light pink cardstock. Once the hearts were cut out I then used my new heart embossing folder to add a little something. Once the hearts were done I set them aside and grabbed a piece of light purple cardstock and decided to give it some dimension so added a generous amount of foam tape to the back. This card would probably not be the best for mailing since you would need to pay for extra postage but since I was going to be hand delivering the card it worked out fine. After the foam tape was adhered I then placed it onto the card base which is just some plain 110 pound white cardstock from staples that I picked up in a big pack and scored using my Martha Stewarts Score board. Following the background being stuck down I grabbed the two hearts that I cut out and placed them on the card moving them around until I found exactly where I want them to sit and then used some Elmer’s clear liquid glue to attach them to the front of the card. Once they were attached I grabbed the 60 that I had previously cut out and forgot that I was not filming. For the 60 I cut it out using my cricut machine and the Plantin Schoolbook cartridge. I then added some glitter to make it stand out more. For attaching it to the front of the card I used some foam tape since I wanted it to stand out and be the main focus since this was a special card. The last thing I added to the card was a boarder along the bottom. I used one of my Fiskars boarder punches and some white cardstock. I attached it using some Elmer’s clear liquid glue and thought the card looked complete. Supplies
June 8, 2016 Winter Themed Scrapbook Page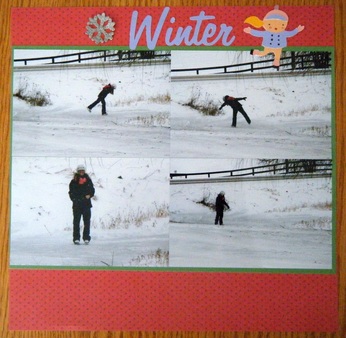
Hello Everyone,
For this layout I decide to use the Mambi Christmas kit. I looked through the kit and found a red piece of paper with white polka dots that would work great with the pictures I had. One thing I like about this kit is the quality of the paper it has a nice thickness and is not super thin like some other papers I have tried before. After I choose the background paper I thought the pictures could use a boarder around them so I grabbed some green cardstock that matched the background paper I was using. I then used my ATG Tape runner to adhere the pictures. Once they were adhered I then took my fiskars paper cutter and cut down the paper. Once the paper was cut down I adhered it to the background paper with my ATG Tape runner. Following the pictures begin attached I still thought the page was missing something so I used my Cricut machine and the winter frolic cartridge I cut out the skater. For the skater I cut her body and face out of some peach cardstock. The face had some tiny checks and eyes that came out instead of using them since they were too small I decided to use my EK success markers to add colour to the checks and eyes in the end it worked out well. Following the body and face I used my Zig Two way glue pen to attach the rest of the pieces to the skater. I cut out the jacket and rim off the hat with some light purple cardstock. The skates, gloves and hat were all cut out with some pink cardstock. After the skater was done I then used the same cartridge to cut out the word winter out of some light purple cardstock. The word winter was to be used over the title winter wonderland but since I didn’t want the word wonderland I just used the word winter. I used my zig two way glue pen to attach it to the top of the page. The last two things I did to tie the page together was to add the skater after the word winter and then I also looked through my stash and found a pretty snowflake and attached it to the page with some liquid glue. Supplies
|

|
|
|
|
|
|

Stay Connected .....

|

|

|
Shop these great online stores: